Plant propagation is the branch of horticulture which deals with the deliberate (or intentional) production of new plants using various starter materials, including their intensive but temporary care. It is primarily practiced to produce seedlings or clones of plants for planting in containers for display or decor or other uses.
To understand the science of why, when, and how to propagate requires basic knowledge of plant growth and development, plant anatomy and morphology, and plant physiology.
Plumeria Propagation Methods
In general, there are two methods of propagating plumeria: sexual and asexual.
Sexual propagation is with the use of seeds that is separated from the parent plumeria. This method is so termed “sexual” because there is the involvement of the sexes, referring to the contribution of both the male and female gametes in the production of new plants.
The propagated plumeria therefore has a genotype which results from combining those which originate from the parental sources of male and female gametes. Consequently, the resulting plumeria may exhibit either, or somewhat different, or a combination of parental characteristics.
The young plumera that is produced from seed is called seedling while clonal seedling or simply clone is used for that which is vegetatively produced. However, seedling is now used as a general term to refer to any young plant without regard to the method of propagation.
It does not mean, however, that all plumeria which are propagated by seed are sexually reproduced. Plumeria can produce apomictic seeds. Apomixis is the production of seeds without sexual union.
There are several advantages of sexual propagation:
- It may result in new cultivars and vigorous hybrids.
- It provides a way to avoid transmission of particular diseases, such as viruses.
- It maintains genetic variation, which increases the potential for plants to adapt to environmental pressures.
Asexual propagation, also called vegetative propagation, is with the use of planting materials which are vegetative parts of any plant rather than seeds or spores which are reproductive parts. In most techniques, the propagule is separated first from the parent plumeria and treated to induce regeneration or otherwise directly planted.
Tissue culture, also called in vitro culture and micropropagation, is the technique of propagating plants indoor under aseptic or sterile conditions in artificial growth media. The growth medium, also called nutrient solution, is a mixture of essential elements. The initial propagule in tissue culture is called explant.
Sexual Propagation
Sexual propagation is the reproduction of plants by seeds. The genetic material of two parents is combined by pollination and fertilization to create offspring that are different from each parent.
Seeds
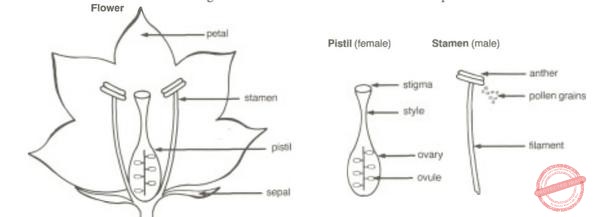
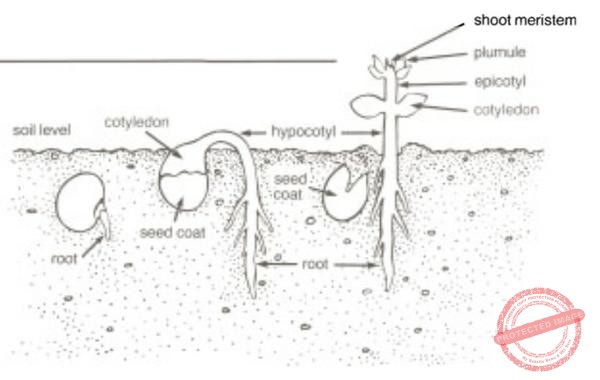
A seed is composed of three major parts: embryo, nutritive (food storage) tissue, and protective tissue. The embryo is a miniature plant in a resting (dormant) state. Plumeria seeds contain a built-in food supply called the endosperm. The protective outer covering of a seed is called the seed coat. It protects seeds from mechanical injury and from diseases and insects. Also, the seed coat usually prevents water from entering the seed until time to germinate. The seed coat allows seeds to be stored for extended periods. The seed leaves, cotyledons, differ in shape from the true leaves. Plumeria are dicots and produce two cotyledons.
To obtain vigorous plumeria from seeds, start with high-quality seeds from a reliable source. Select cultivars that have a chance of providing the desired size, color, and growth habit. Choose cultivars already adapted to your area. Some cultivars are hybrids and may cost more than open-pollinated types, but they usually have a better chance of producing the desired characteristics than non-hybrids.
Purchase only enough seeds for one year because the likelihood of germination decreases with age. Plumeria seeds have been know to germinate after 10 years, but only 10% of the test group germinated. The seed packet label usually indicates essential information about the cultivar or species, such as the year in which the seeds were packaged, the germination percentage, and whether the seeds have received any chemical treatment.
If seeds are obtained well ahead of the actual sowing date (or are surplus seeds), store them in a cool, dry place. Laminated or foil packages help ensure dry storage. Paper packets are best kept in tightly sealed containers and maintained around 40°F in low humidity. A good storage location would be an airtight jar. Collectors can save money and cultivate a rewarding hobby by saving seeds from plumeria in their own gardens. Seeds that have been produced through insect, animal or wind, or other natural pollination methods are known as open-pollinated. Open-pollination can increase biodiversity, and plumeria will almost always display different characteristics than the parent plants. This is especially true when saving seed from hybrids.
Germination
Germination is the resumption of active embryo growth after a dormant period. Three conditions must be satisfied for a seed to germinate:
- The seed must be viable; that is, the embryo must be alive and capable of germination.
- Internal conditions of the seed must be favorable for germination; that is, any physical, chemical, or physiological barriers to germination must have disappeared or must have been removed by the propagator.
- The seed must be subjected to appropriate environmental conditions, including water (moisture), proper temperature and oxygen.
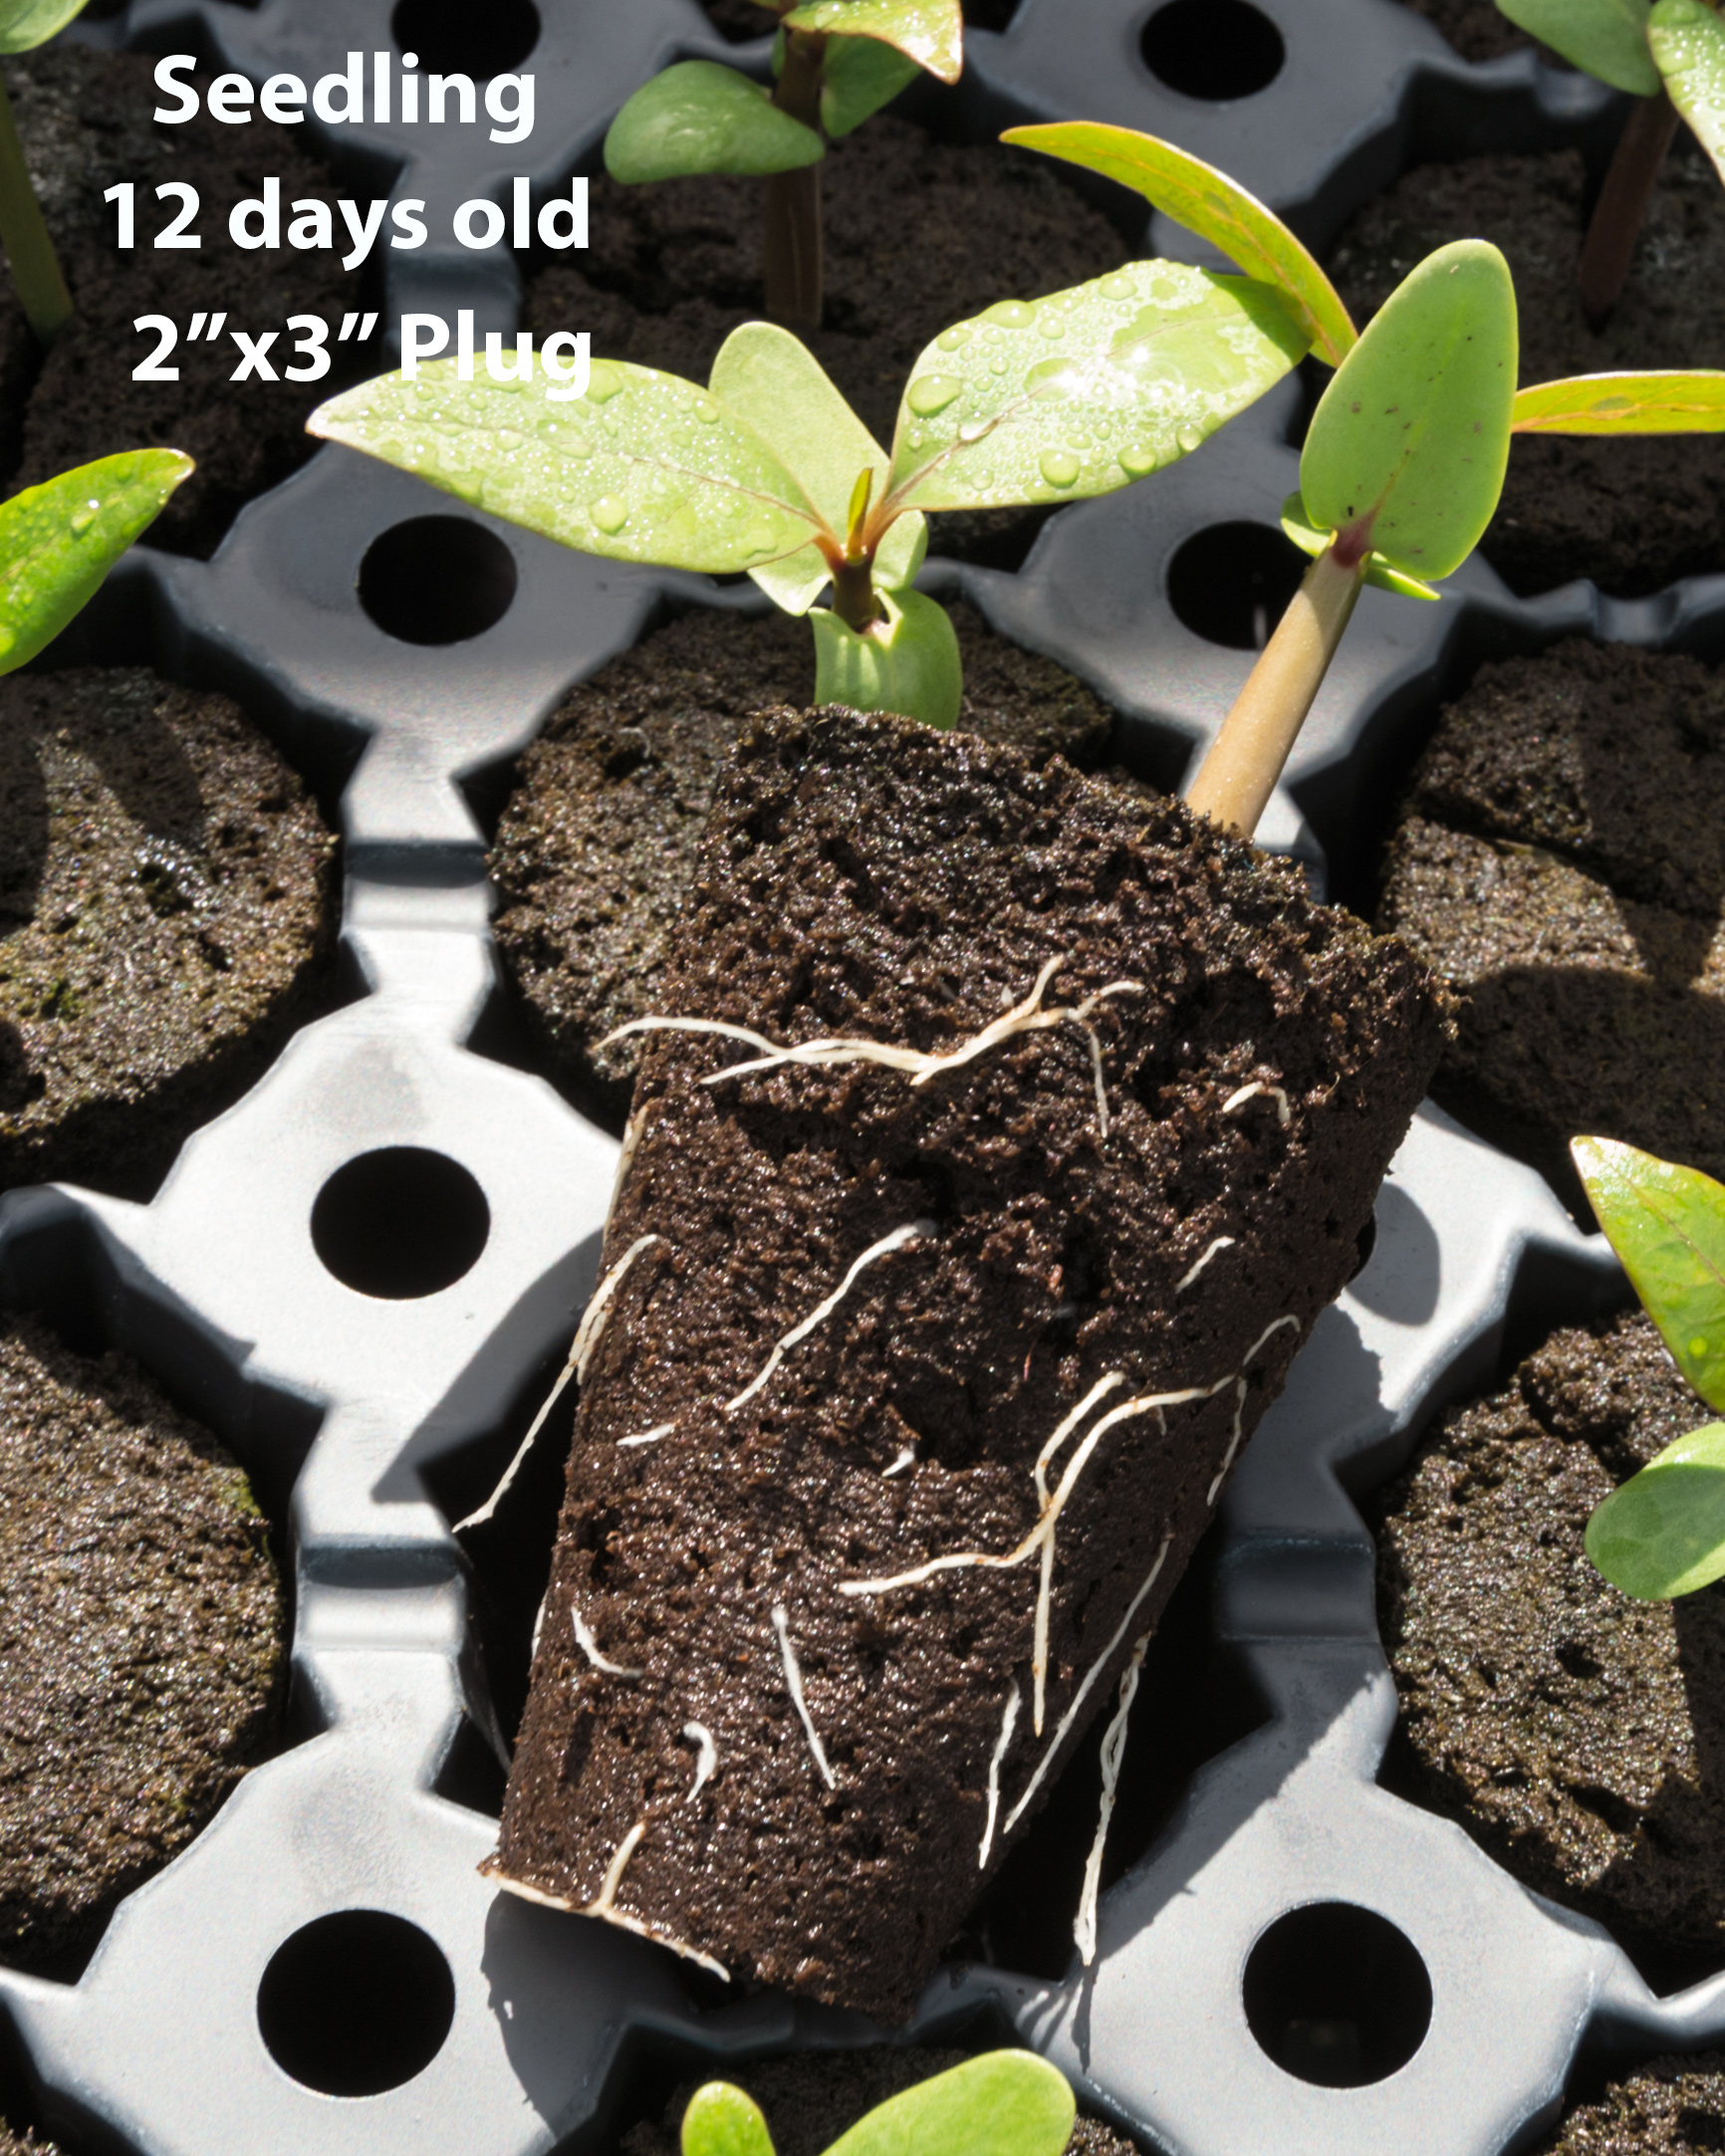
The first step in germination is absorption of water. An adequate, continuous supply of moisture is important to ensure germination. Once germination has begun, a dry period can kill the embryo.
Plumeria germinate in either light or dark. Respiration in dormant seeds is low, but they do require some oxygen. Respiration rate increases during germination. The medium in which the seeds are sown should be loose and well aerated. If the oxygen supply during germination is limited or reduced, germination can be severely retarded or inhibited.
Temperature affects the germination percentage and the rate (speed) of germination. Plumeria seeds have a minimum germination of 50°F, a maximum of around 95°F, and an optimum germination temperature of 80°F. The optimum temperatures for most plumeria is 75 to 85°F.
Seed Dormancy
Viable seeds that do not germinate are dormant. Dormancy can be regulated by the environment or by the seed itself. If a seed is not exposed to sufficient moisture, proper temperature or oxygen the seed will not germinate. In this case, the seed’s dormancy is caused by unfavorable environmental conditions.
Some seeds may not germinate because of some inhibitory factor of the seed itself. This kind of dormancy consists of two general types: (a) seed coat (or external) dormancy and (b) internal (endogenous) dormancy. A seed can also exhibit both kinds of dormancy.
Growing Plumeria from Seeds
Media
A wide range of media can be used to germinate seeds. With experience, you will learn to determine what works best for you. The germinating medium should be fine and uniform yet well aerated and loose. It should be free of insects, disease organisms, nematodes, weeds, and weed seeds. It should also be of low fertility and capable of holding moisture but be well drained. Purchase commercial seed growing media containing fine-particle pine bark, sphagnum peat moss, and perlite, or prepare a combination of equal parts (by volume) of these materials. Do not use garden (mineral) soil to start seedlings; it is not sterile, it is too heavy, and it does not drain well. Soil mixes have little fertility, so seedlings should be watered with a dilute fertilizer solution soon after germination and emergence.
Containers
Plastic cell packs can be purchased or reused if sterilized. In most systems, each cell holds a single plant. This method reduces the risk of root injury when transplanting. Peat pellets, peat pots, or expanded foam cubes can also be used for producing seedlings. Resourceful gardeners often use cottage cheese containers, the bottoms of milk cartons, bleach containers, or plastic cups. Just make certain that adequate drainage holes are made in the bottoms of the containers and that the containers are sterile.
Sterilizing Containers
The importance of using sterile medium and containers cannot be overemphasized. Before using the containers, wash them to remove any debris, immerse them in a fresh solution of one part chlorine bleach to nine parts water for five minutes, and allow them to dry.
Starting Seeds
Seedlings are often started indoors often using heated grow mats. A common mistake is to sow the seeds too early and then attempt to hold the seedlings under poor environmental conditions. This usually results in tall, weak, spindly plants that do not perform well in the garden. The following paragraphs give general guidelines for sowing seeds for transplants.
When sowing plumeria seeds, fill the container to within 3⁄4-inch of the top with moistened growing medium.
Plumeria Seedlings in individual containers are easier to label and handle at transplanting time than those that have resulted from broadcasting. Place the seed with the fan up and the bulk part of the seed almost all the way in the soil leaving the fan sticking out of the soil. Sow the seeds with the fan pointing up or by uniformly spreading the seeds over a tray filled with soil. Cover the seeds lightly; a suitable planting depth is usually about 1/4 inch of soil over the seeds.
Plumeria seeds are frequently sown directly in a small container or cell pack, which eliminates the need for early transplanting. Usually, one seeds per cell.
Most garden stores and seed catalogs offer indoor or outdoor grow mats. Grow mats have a precisely controlled temperature. Grow mats allow uniform emergence, eliminate overcrowding, and permit sowing indoor and before warm weather.
Water and Light
Moisten the planting medium thoroughly before planting. After seeding, spray with a fine mist or place the containers in a pan or tray that contains about 1 inch of warm water. When the planting mix is saturated, set the container aside to drain. The soil should be moist but not overly wet.
The seed flats should remain sufficiently moist during the germination period. Excessive moisture, however, can lead to damping-off or other disease or insect problems. Place the whole flat or pot into a clear plastic bag to maintain moisture. The plastic should be at least 1 inch above the soil. Keep the container out of direct sunlight; otherwise, the temperature may increase and injure the seeds. Be sure to remove the plastic bag or glass cover when the first seedlings emerge.
After the seeds have germinated, move the flats to a sunny location; the temperature should be over 75°F during the day and a minimum of 60°F at night. This prevents soft, leggy growth and minimizes disease problems. Some, of course, will grow at different temperatures.
Indoors, seedlings must receive bright light after germination. Place them in a south-facing window. If a large, bright location is not available, place the seedlings under fluorescent lights. Use two 40-watt, cool-white fluorescent tubes or special plant growth lamps. Position the plants 6 inches below the light source and provide 16 hours of light daily. As the seedlings grow, the lights should be raised.
Transplanting Seedlings
Plumeria seeds not seeded individually must eventually be transplanted into their own containers as seedlings to give them proper growing space. A common mistake is to leave the seedlings in the flat or common container too long. The ideal time to transplant young seedlings is when the first true leaves appear.
For grouped seedlings, dig up the small plants carefully with a knife or plant label. Let the group of seedlings fall apart and pick out individual plants. Gently ease them apart to avoid root injury in the process. Handle small seedlings by their leaves, not their delicate stems. Using a small tool or your finger, punch a hole in the medium. Plant a seedling at the same depth at which it was growing in the seed flat. Firm the soil and water gently. Keep newly transplanted seedlings in the shade for a few days, or place them under fluorescent lights. Locate them away from sources of direct heat. Continue watering and fertilizing as in the seed flats.
Containers for seedlings should be economical, durable, and make efficient use of available space. Individual pots or plastic cell packs can be used. Another possibility is compressed peat or coir plugs, which expand to form compact individual pots when soaked in water. They waste no space, do not fall apart as easily as peat pots, and can be set out directly in the next size pot when time to transplant. If you wish to avoid transplanting seedlings altogether, compressed peat or coir pellets are excellent for direct sowing.
When setting plants outdoors that were grown in peat or coir pots, be sure to break the mesh on the sides of the pot and to cover the pot completely with growing media. If the top edge of the peat pot extends above the soil level, it may act as a wick and draw water away from the soil in the pot. Tear off the top lip of the pot and plant below the soil surface.
The three parts to a seed:
- The protective tissue or seed coat
- The embryo which grows into a new plant.
- The endosperm which is the nutritive or food storage supplying nutrients to the embryo.
Asexual Propagation Cuttings
Asexual propagation is the process of taking vegetative pieces of a desirable plant and reproducing new plants from these tissues. Asexual propagation permits cloning of plants, meaning the resulting plants are genetically identical to the parent plant. The major methods of asexual propagation are cuttings, layering, division, separation, budding, grafting, and micropropagation (tissue culture).
CUTTINGS
Propagation by cuttings involves rooting a severed piece of the parent plant or, in some cases, producing new plants from severed pieces of tissue (leaf cuttings). A greenhouse is not necessary for successful propagation by cuttings. Cutting are best propagated at the beginning of the growing season.
If rooting only a few cuttings, you can use a flowerpot. Maintain high humidity by covering the pot with a bottomless milk jug or by placing the pot into a clear plastic bag. Cuttings can also be placed in plastic trays covered with clear plastic stretched over a wire frame.
Containers must have holes in the bottoms for drainage. The plastic helps keep the humidity high and reduces water loss from the plant. If a more elaborate structure is needed, construct a small hoop frame or use an intermittent mist system. Horticulture Information Leaflet, A Small Backyard Greenhouse for the Home Gardener, may be helpful.
The rooting medium should be sterile, low in fertility and well drained to provide sufficient aeration. Materials commonly used are coarse sand, a mixture of one part peat and one or two parts perlite (by volume), or one part peat and one part sand (by volume). Various commercial potting media may also be used. Vermiculite by itself is not recommended because it packs and tends to hold too much moisture.
There are several different kinds of cuttings. Which type you use depends on the growing habit of the plant and, often, the plant’s growth stage. The vast majority of cuttings are tip cutting, but center cutting are also use.
Types of Rooting Media
Peat moss consists of the remains of aquatic, marsh, or bog vegetation that have been preserved under water in a partially decomposed state. Peat bogs are vital ecosystems. They provide unique habitats for wetland plants and animals, actively absorb runoff and prevent erosion, filter contaminants out of water, and are the largest carbon sinks on earth. Peat moss has been harvested for fuel as well as horticultural use for many years. Unfortunately, it is regenerated at extremely slow rates and harvesting this resource is not considered sustainable. Several environmentally friendly alternatives to peat moss include composted bark, coconut coir, brewing waste, and pulp and paper sludge. There are different types of peat moss, some more suitable than others. Sphagnum peat moss is recommended because it tends to be acidic, with a pH ranging from 4.0 to 5.0, and because it usually has very low fertility. Materials such as Michigan peat, peat humus, and native peat are usually too decomposed to provide satisfactory structure and drainage. Peat moss should be broken apart and moistened before use. Coir pith is also known as Coco peat or Coir dust. This by-product of the coir industry can be converted into organic manure using biotechnology, making it ideal for gardening and horticulture. A wide variety of Coir pith products such as Coir pith grow bag, Coir pith bale, Coir pith Briquettes, Coir pith Discs, and Coco chips are ideal for your gardening and horticultural needs. Coirpith not only revitalizes your plants, it induces uniformity in growth by enhancing water retention and microbial activity. Coir pith contains high quality of nutrients that keep the soil healthy in a natural way. It acts as a top dressing that helps maintain moisture and reconditions the soil. Coir pith enhances the nutrient carrying capacity of plants. Sustainable agriculture practices such as this creates a healthy perfect loop from table to earth. Pure and natural, this organic biodegradable matter is an economical and natural alternate for rockwool slabs, peatmoss and perlite. Vermiculite is a sterile, lightweight medium produced by heating a type of clay to 2000°F. Vermiculite holds large quantities of air, water, and nutrients. The pH usually ranges from 6.5 to 7.2. Vermiculite is available in four particle sizes. Use the larger-sized particles because they provide better soil aeration. For horticultural mixes, sizes 2 or 3 are generally used. Perlite is produced from a type of volcanic rock that is crushed, screened, and then heated to approximately 1400°F. The result is a very lightweight, porous material. Its principal value in propagation mixtures is aeration. It does not hold water and nutrients as well as vermiculite. The pH ranges from 7.0 to 7.5. Sometimes perlite can cause fluoride burn, usually on the leaf tips of some foliage plants. Sand consists of small, weathered rock particles, usually silicaceous in origin. It is heavy and has no nutrient value. Sand occurs in different grades; sharp builders’ sand is best for propagation. Fine sands are not recommended. Sterilize sand before using it; sand may contain various disease pathogens, weeds, and weed seeds. Bark, partially decomposed pine bark, is often used as a rooting medium. Milled pine bark is lightweight, has a pH of 5.8 to 6.0, and is capable of holding nutrients while providing excellent drainage and aeration. |
Leaf-Bud Cuttings
Leaf-bud cuttings are used when space or cutting material is limited. Each node on a stem can be treated as a cutting. The cutting consists of a leaf blade, petiole, and a short piece of stem with an attached axillary bud. Place cuttings in the medium with the bud covered (to 1 inch) and the leaf exposed. A modified version of a leaf-bud cutting, referred to as a single node cutting, can be prepared simply by cutting the stem below and above the leaf petiole having a well-developed axillary bud. Examples of plants propagated this way include blackberry, camellia, clematis, devil’s ivy, dracaena, grape ivy, heart-leaf philodendron, jade plant, mahonia, rhododendron, and rubber plant.
Center Cuttings
A center cutting is an easy way to propagate some overgrown, leggy plumeria. Leafless stem sections (12 to 18 inches long) are cut from older stems. Each center cut should contain multiple leaf nodes. Insert the cutting vertically with about 3″ of the cutting below the surface of the medium, and leave a bud facing upward. Center cuttings are usually potted when roots and new shoots appear.
Tip Cuttings
Propagation by stem cuttings is the most commonly used method for plumeria plants. Typically, tip cuttings of some cultivars and varities are more difficult to root successfully; however, cuttings from almost all plumeria trees can be rooted.
Types of Stem Cuttings
The four main types of stem cuttings are herbaceous, softwood, semi-hardwood, and hardwood. These terms reflect the growth stage of the stock plant, which is one of the most important factors influencing whether cuttings produce roots. Calendar dates are useful only as guidelines. Refer to Table 13–2 for more information on optimum growth stages for rooting stem cuttings of various woody ornamentals.
- Softwood cuttings are prepared from soft, succulent, new growth of woody plants, just as it begins to harden (mature). It is believed by many this type of cutting is best for grafting. Shoots are suitable for making softwood cuttings when they still have a gradation of leaf size (oldest leaves are mature whereas newest leaves are still small). This stage typically occurs in May, June, or July. The soft shoots are quite tender, and extra care must be taken to keep them from drying out and are not considered good for rooting and have a greater tendency to root.
- Semi-hardwood cuttings are usually prepared from partially mature wood of the current season’s growth, just after a flush of growth. This type of cutting normally is made from mid-June to late summer. The wood is reasonably firm and the leaves of mature size.
- Hardwood cuttings are taken from mature stems from the previous years growth in late winter or early spring. Plants are generally just coming out of dormancy with some obvious signs of active growth. The wood is firm and does not bend easily. Hardwood cuttings are most often used for rooting. A straight single tip cutting is the most commonly used stem cutting.
Procedures for Rooting Woody Stem Cuttings
Cuttings should generally consist of the current or past season’s growth. Avoid material with flower buds. Remove any flowers and flower buds when preparing cuttings so the cuttings’ energy can be used in producing new roots rather than flowers. Take cuttings from healthy, disease-free plants.
The fertility status of the stock (parent) plant can influence rooting. Avoid taking cuttings from plants that show symptoms of nutrient deficiency. Conversely, plants that have been fertilized heavily, particularly with nitrogen, also may not root well. The stock plant should not be under water stress. In general, cuttings taken from young plants root quicker than cuttings taken from older, more mature plants. Cuttings from lateral shoots often root better than cuttings from terminal shoots.
Early morning is the best time to take cuttings because the plant is fully turgid. It is important to keep the cuttings cool and moist until they are stuck. An ice chest or a dark plastic bag with wet paper towels may be used to store cuttings. If there will be a delay in sticking cuttings, store them in a plastic bag in a refrigerator.
While terminal bud ends of the stem are best, a long shoot can be divided into several cuttings. Cuttings are generally 4 to 6 inches long. Use a sharp, thin bladed pocketknife or sharp pruning shears. Dip the cutting tool in rubbing alcohol or a mixture of one part bleach to nine parts water to prevent transmitting diseases from infected plant parts to healthy ones.
Remove the leaves on the lower one-third to one-half of the cutting. On large-leafed plants, the remaining leaves may be cut in half perpendicular to the mid vein to reduce moisture loss and conserve space in the rooting area.
During preparation of stem cuttings of particular woody species, the lower portion of the stem that is inserted into the rooting media is deliberately wounded, which is done to stimulate rooting. Most species do not require wounding, but some benefit greatly from this practice.
There are two general types of wounds, light and heavy. A light wound consists of two or four equidistant vertical cuts, administered with a knife or single-edge razor blade, to the lower portion (approximately 1 to 1½-inches) of the cutting. The cuts go through the bark into the wood but are not deep enough to split the stem. Many conifer cuttings respond to light wounds. On the other hand, a heavy wound consists of removal of a thin strip of bark on one or opposite sides of the lower 1 to 1½-inches of a cutting, exposing the green tissue just beneath the bark termed the cambium. Be careful when applying a heavy wound not to remove (scrape) all the bark from the lower portion of the stem as this kills the cutting or prevents it from rooting. Species that respond to heavy wounding include magnolias and evergreen rhododendrons. As mentioned previously, most species do not require wounding. There is nothing wrong, however, with using wounding, whether it be light or heavy, on all species provided it is done properly. Also, wounding by itself is of no benefit unless cuttings are treated with root-promoting compounds after wounding.
Treating cuttings with root-promoting compounds (chemicals), particularly for difficult-to-root species, is a common practice when rooting woody stem cuttings because these compounds increase the percentage of cuttings that form roots, speed up the rooting process (make the cuttings root faster), increase the uniformity of rooting, and lastly increase the number and quality of roots produced per cutting. Root-promoting compounds are generally available commercially in two forms, powders or liquids.
When treating cuttings with root-promoting compounds, prevent possible contamination of the entire supply (stock) of formulation by putting some in a separate container before treating cuttings. Any material remaining after treatment should be discarded and not returned to the original container. Be sure to tap the lower portion of the cutting to remove excess material when using a powder formulation. If the base of the cutting is not moist, moisten it with water before applying a powder formulation so the powder adheres to the base. Once the cuttings have been treated with a powder formulation, use a dibble for inserting them into the rooting medium so the powder stays on during insertion. When treating cuttings with a liquid formulation of a root-promoting compound, dip the lower ½-inch to 2 inches of a cutting into the solution for 1 to 2 seconds followed by 15 to 20 minutes of air drying; then insert the cutting into the rooting medium without the use of a dibble.
Use a rooting medium such as coarse sand, pine bark, or a mixture of one part peat and one or two parts perlite (by volume), or peat and sand (1:1 by volume). The rooting medium should be sterile, low in fertility, sufficiently well drained to permit aeration, and moisture retentive enough so that it does not have to be watered too frequently. Moisten the medium before inserting cuttings. Various commercial potting mixes can be used. Insert the cuttings one-third to one-half of their length into the medium with the buds pointing upward. Do not insert the stem upside down. Space cuttings just far enough apart to allow all leaves to receive sunlight. Water again after inserting the cuttings if the containers or frames are 3 or more inches deep. Cover the cuttings with plastic and place in indirect light. Keep the medium moist until the cuttings have rooted. Rooting is improved if the plants are misted on a regular basis.
Rooting time varies with the type of cutting, the species being rooted, and environmental conditions. Conifers require more time than broadleaf plants. Late fall or early winter is a good time to root conifers. Once rooted, conifer cuttings may be left in the rooting structure until spring.
Figure 13–7. Remove the petiole, cut the veins, and then lay the leaf of a rex begonia flat on the medium surface. A new plant will grow from each cut vein.

Figure 13–8. Many plants can be propagated by leaf-bud cuttings.
Asexual Propagation – Other Methods
LAYERING
Stems still attached to their parent plant may form roots where they come in contact with a rooting medium. This method of vegetative propagation is generally successful because water stress is minimized and carbohydrate and mineral nutrient levels are high. The development of roots on a stem while the stem is still attached to the parent plant is called layering. A layer is a rooted stem after it has been removed from the parent plant. Some plants propagate naturally by layering, but sometimes plant propagators assist the process. Layering is enhanced by wounding one side of the stem where the roots are to form or by bending it very sharply. The rooting medium should always provide aeration and a constant supply of moisture. Some common forms of layering are as follows. However, keep in mind these protocols are sometimes modified.
Air layering (pot layering, circumposition, marcottage, Chinese layering, gootee). Air layering can be used to propagate large, overgrown houseplants (such as rubber plants or dieffenbachia that have lost most of their lower leaves) as well as some woody ornamentals such as camellias. The process varies depending on whether the plant is a monocot or dicot. For monocots, such as Dracaena fragrans ‘Massangeana’ (corn plant), make an upward cut about one-third of the way through the stem. This is normally done on a stem about 1 foot from the tip. The cut is held open with a toothpick or wooden matchstick Surround the wound with damp, unmilled sphagnum moss. Wrap the moss with plastic and hold in place with twist ties or electrician’s tape. Aluminum foil can also be used; it does not require twist ties or tape to hold it in place.
The process for dicots is similar except a 1-inch ring of bark is removed from the stem. Scrape the newly bared ring to remove the cambial tissue in order to prevent callus from forming. Wrap and cover using the same procedure as that described for monocots.
After the rooting medium is filled with roots, sever the stem below the medium. The new plant requires some pampering after planting until the root system becomes more developed.
Natural forms of layering – Sometimes layering happens without the help of a propagator. Runners and offsets are specialized structures that facilitate propagation by layering.
A runner produces new shoots where it touches the growing medium. Plants that produce stolons or runners are propagated by severing the new plants from their parent stems. Plantlets at the tips of runners may be rooted while still attached to the parent or detached and placed in a rooting medium. Examples include strawberry and spider plants.
Plants with a rosetted stem often reproduce by forming new shoots, called offsets (offshoots), at their base or in the leaf axil. Sever the new shoots from the parent plant after they have developed their own root system. Unrooted offsets of some species may be removed and placed in a rooting medium. Some of these must be cut off, whereas others may simply be lifted from the parent stem. Examples include date palm, haworthia, bromeliads, and many cacti.
SEPARATION AND DIVISION
Separation and division are the easiest and quickest ways to propagate many plants. Separation uses naturally occurring vegetative structures such as bulbs and corms. Individual bulbs or corms are separated from a clump. Most of the spring- and summer flowering bulbs are propagated this way. Division involves digging up the plant or removing it from its container and cutting (dividing) the plant into separate pieces. Division uses specialized vegetative structures such as rhizomes and tubers. Indoor plants that can be propagated by division include ferns, snake plant, prayer plant, and African violet. Outdoor plants that can be divided include many perennials such as daylily, hosta, iris, liriope, and verbena. Separation and division are normally done in the fall or early spring.
BUDDING AND GRAFTING
Budding
Budding and grafting are methods of asexual propagation that join parts of two or more different plants together so they unite and grow as one plant. These techniques are used to propagate cultivars that do not root well from cuttings or to alter some aspect of the plant (for example, to create weeping or dwarf forms).
Most fruit and nut trees are propagated by budding or grafting.
The scion consists of a short stem piece with one or more buds and is the part of the graft that develops into the top of the grafted plant. The rootstock (also called stock or understock) provides the new plant’s root system and sometimes the lower part of the stem. Seedling rootstocks are used commonly.
Six conditions must be met for bud grafting to be successful:
The scion and rootstock must be compatible (capable of uniting).
The scion and stock plant must be at the proper physiological stage of growth.
The cambial region of the scion and the stock must be in close contact—touching if possible.
Proper polarity must be maintained (the buds on the scion must be pointed upward).
Immediately after grafting, all cut surfaces must be protected from drying out.
Proper care must be given to the graft after grafting.
Once the bud has healed and broken to form a shoot, the top of the stock plant is cut back (removed) to the bud union.
Not all plants can be grafted. The two plants should be closely related taxonomically. Grafting between clones and seedlings of the same species is usually successful.
Budding, or bud grafting, is the union of one bud, with or without a small piece of bark, from one plant (scion) onto a stem of a rootstock. It is especially useful when scion material is limited. Budding is usually done during the growing season when the bark is slipping (soft and easy to peel back from the cambium), June through August in the Southeast U.S., but it can also be done in late winter or early spring.
T-budding—This is the most commonly used budding technique. When the bark is slipping, make a vertical cut (same axis as the rootstock) through the bark of the rootstock, avoiding any buds on the stock. Make an intersecting, horizontal cut at the top of the vertical cut (forming a “T” shape), and loosen the bark by twisting the knife slightly at the intersection. Remove a shield shaped piece of the scion, including a bud, some bark, and a thin section of wood. Push the shield under the loosened stock bark at the “T”. Wrap the union, leaving the bud exposed. Many fruit trees are propagated by this method.
Chip budding—This method can be used when the bark is not slipping. Although all the basics in handling budwood and stock are the same for chip budding and T-budding, the cuts made in chip budding differ radically. The first cut on both stock and scion is made at a 45o to 60o downward angle to a depth of about ⅛-inch. After making this cut on a smooth part of the rootstock, start the second cut about ¾-inch higher and draw the knife down to meet the first cut. (The exact spacing between the cuts varies with species and the size of the buds.) Then remove the chip. Cuts on both the scion (to remove the bud) and the rootstock (to insert the bud) should be exactly the same size. Although the exact location is not essential, the bud is usually positioned one-third of the way down from the beginning of the cut. If the bud shield is significantly narrower than the rootstock cut, line up one side exactly. Wrapping is extremely important in chip budding. If all exposed edges of the cut are not covered, the bud dries out before it can “take.” Chip budding has become more popular over the past five years because of the availability of thin (2 mil) polyethylene tape as a wrapping material. This tape is wrapped to overlap all of the injury, including the bud, and forms a miniature plastic greenhouse over the healing graft.
Grafting
Grafting is the union of the stems of two plants to grow as one. There are several kinds of grafting; which method to use depends on the age and type of plants involved.
Whip or tongue grafting—This method is often used for stems ¼-inch to ½-inch in diameter. The scion and rootstock are usually of the same diameter. This graft provides excellent cambial contact and heals quickly. Make a sloping cut 1-inch to 2½-inches long at the top of the rootstock and a matching cut on the bottom of the scion. On the cut surface, slice downward into the stock and up into the scion, so the pieces will interlock when brought together. Fit the pieces together such that the cambium matches on at least one side, and then wrap and tie or wax the graft union.
Cleft grafting—Cleft grafting is one of oldest and most widely used methods of grafting. The two most common circumstances when one would use this technique are (1) when creating a weeping ornamental tree and (2) when upgrading an older cultivar of a fruit tree to a newer, improved one while maintaining the existing root system. Cleft grafting is best done in early spring when the buds on the stock plant are beginning to swell but before active growth has begun. The scions, however, must be fully dormant. Collect scion wood ⅜ to ⅝ -inch in diameter during the dormant season and refrigerate until needed.
Cut the limbs to be reworked at a right angle to the main axis of the branch. Use a heavy knife to split the branch, making a 2-inch vertical cut through the center of the stub to be grafted. Be careful not to tear the bark. Keep this cut wedged apart. Prepare two scion pieces 3 to 5 inches long; cut the lower end of each scion piece into a wedge. Insert the scions at the outer edges of the cut in the stock. Tilt the top of the scion slightly outward and the bottom slightly inward to be sure the cambial layers of the scion and stock touch. Remove the wedge propping the slit open, and cover all cut surfaces with grafting wax. If both scions grow, one can be removed later.
Some other types of grafting include splice, side, stub, side veneer, and side tongue. Check reference books for additional information. Each method has advantages for special situations.
Care of grafts—Grafting is not likely to be successful unless you properly care for the grafted plants for a year or two after grafting. If you use binding materials such as waxed string or nursery tape on the graft, remove them shortly after growth starts to prevent girdling. Rubber budding strips have some advantages over other materials. They expand with growth and usually do not need to be removed because they deteriorate after several months. Inspect the grafts after two or three weeks to see if the grafting wax has cracked and, if necessary, rewax the exposed surface. After this, the union will probably have healed and no more waxing will be necessary.
Limbs on the old cultivar (rootstock) that are not selected for grafting should be cut back at the time of grafting. The total leaf surface of the old cultivar should be reduced gradually as the new one increases for one or two years; by this time, the new cultivar (scion) has had adequate time to grow. Completely removing all the limbs of the old cultivar at the time of grafting increases the shock to the tree and causes excessive suckering. Also, the scions may grow too fast, making them susceptible to wind damage.
MICRO PROPAGATION
Micro propagation involves the application of tissue culture techniques to propagate plants from very small plant parts (parts of leaves, stems, shoot tips, root tips, single cells, and pollen grains). The small plant part is grown (cultured) in a test tube, petri dish, or other sterilized container with a culture medium and precise environmental conditions. The container and growing medium must be sterilized. Because plants often harbor bacterial and fungal spores, the plant tissue must also be disinfected.
Micro propagation is a rapidly growing part of the plant propagation industry. It is not practical for most home gardeners because of the very specific requirements of the culture media and the constant efforts that must be made to avoid possible contamination from disease organisms. For nurseries, special care must be taken in transporting micro propagated plants from the lab to the store because they are not acclimated to outdoor growing conditions.
Hardening Plants
Hardening is the process of conditioning a plant for growth outdoors. If plants produced inside are planted outdoors without a hardening period, their growth could be severely limited. Hardening is most critical with early crops, when adverse climatic conditions can be expected.
Hardening is accomplished by decreasing temperature and relative humidity gradually, and reducing water. This procedure results in accumulation of carbohydrates and thickening of cell walls. A change from a soft, succulent type of growth to a firmer, harder type is desired.
The process should be started at least two weeks before plants are to be planted in the garden. Place seedlings outside in a protected area on warm days. Increase the length of exposure gradually. Do not put tender seedlings outdoors on windy days or when temperatures are below 45°F. Even cold-hardy plants will be injured if exposed to freezing temperatures before they are hardened.
The hardening process is intended to slow plant growth. Carried to an extreme, however, hardening can cause significant damage. For example, cauliflower produces thumb-sized heads and fail to develop further if hardened too severely; cucumbers and melons stop growing entirely.