Low-quality or substandard potting media is a major source of problems with plumeria grown in containers (and, really, any container-grown plants). Plumerias that are potted in substandard or old decomposed potting soil are weaker than healthy plants, so they’re more likely to drop leaves, turn yellow, attract pests and just generally die.
Potting media, of course, is just one of the factors that contribute to healthy plumeria. But because most people only re-pot when they have too, it’s actually the hardest single factor to quickly control. Other factors that are much easier to control include moisture levels, pH, humidity, temperature, and light levels.
Because potting soil is so important and relatively hard to change, it’s extra important to pay careful attention to your potting media and start off with the best possible mix. Your plumeria will thank you for it, and ultimately, you’ll end up with healthier plumeria and more blooms.
A good potting media should:
Provide support for the growing plant
Provide adequate drainage, very important for Plumeria
Provide adequate available nutrients (usually through a fertilizer and/or organic matter added to the soil)
Provide adequate aeration around the roots
You can easily find many good potting mixes. Most are based on sphagnum peat moss, with additives like compost, humus, perlite, vermiculite and pumice. Some have water-retention crystals, these are not good for plumeria. You can also find soils with fertilizer added, pine bark, and other ingredients like coir, seaweed and worm castings. I prefer to use a non fertilized soil mix, that way I know what I’m starting with.
For plumeria it is important the soil you select allows for adequate drainage, it has air pockets around the root zone and critically, and how long does it last before the inevitable decay sets in (all organic things decay) and starts to lose its desirable qualities?
Well prepared garden soil is great for growing Plumeria in the ground but when it comes to growing Plumeria in containers, it needs to be changed improved or changed as the roots grow and use up the nutrients.
Soils for containers need to be well aerated and well drained while still being able to retain enough moisture for plant growth.
When choosing what to use to fill containers, never use garden soil by itself no matter how good it looks or how well things grow in it out in the garden. When put into a container both drainage and aeration are severely impeded, and the results are that plumeria grows poorly or not at all.
Soils for containers need to be modified in some way to ensure proper drainage and aeration. Container soils are often referred to as soilless or artificial media because they contain no soil at all. They are often composed of various things such as peat, perlite, vermiculite, bark, coir fiber (ground coconut hulls) in a variety of recipes depending on the manufacture and the type of plant material being grown. They can be found under a variety of trade names and in sizes ranging from a few quarts to bales that are many cubic feet in size. The choice of growing media for plumeria are well drained and don’t retain a lot of moisture over a long period of time. You should choose media that’s courser in texture containing more bark, perlite or sand.
When soil mixes are used, they should be moistened slightly before planting. Fill a tub with the media, add water and lightly fluff the media to dampen it.
Some garden soils can be used as a container media but it needs to be modified or amended. An acceptable soil based mix can be made by using one part garden soil, one part peat moss and one part perlite or coarse builders sand. Don’t use fine beach sand or play sand.
Choosing a Soil Mix for Your Containers
Advantages and Disadvantages
The disadvantage is that the soil you are using may contain insects, weed seeds and disease organisms. Soilless media are generally free of these things. Soil-based media are heavier. This may be an advantage though especially if the containers are used in a very windy location and the extra weight will help keep the pot upright. Soil-based media are also a bit more forgiving when it comes to water and fertility. They tend not to dry out as fast, and they also tend to hold on to nutrients longer. Because soilless media can be a bit more costly, you could mix 25 percent soil with the soilless media to stretch your soilless media for a few more pots.
Can soilless media be reused from year to year? If the plants in the containers were healthy during the growing season with no major disease issues, you could remove the plant material at the end of the season and reuse the media next season. A good way to make sure you soil disease free by putting the soil in a black plastic bag and keep in full sun for a week or so, rotating the bag every few days. You may also have to add some additional new media to fill the container. There will come a time when the media in the container will need to be replaced. Over the course of time, the organic materials that the soilless media is made from a breakdown and decompose to the point where you will lose a lot of nutrients, drainage and aeration properties that are inherent in soilless container media. When that happens, discard the media to the compost pile or to the garden and refill the container with fresh media.
There are also bagged products labeled as topsoil that tend to be largely sedge peat. While they are inexpensive and look very good, once put into a pot they are poorly drained and poorly aerated. They can be used in combination with soilless media products or amended much the same way as if you were using garden soil.
When filling containers with media, don’t fill the pot to the top. Leave about a one-inch space between the top of the soil and rim of the pot. This will help make watering the pot easier as it provides a place to “put water” and not have it run over the edge.
Filling very large containers can be costly especially when using commercially prepared media. To reduce the cost and also the weight of the container consider adding “filler” to the bottom of the container to take up space. Many things can be used, but chipped mulch will decompose and add nutrients to your pot over the course of the growing season.
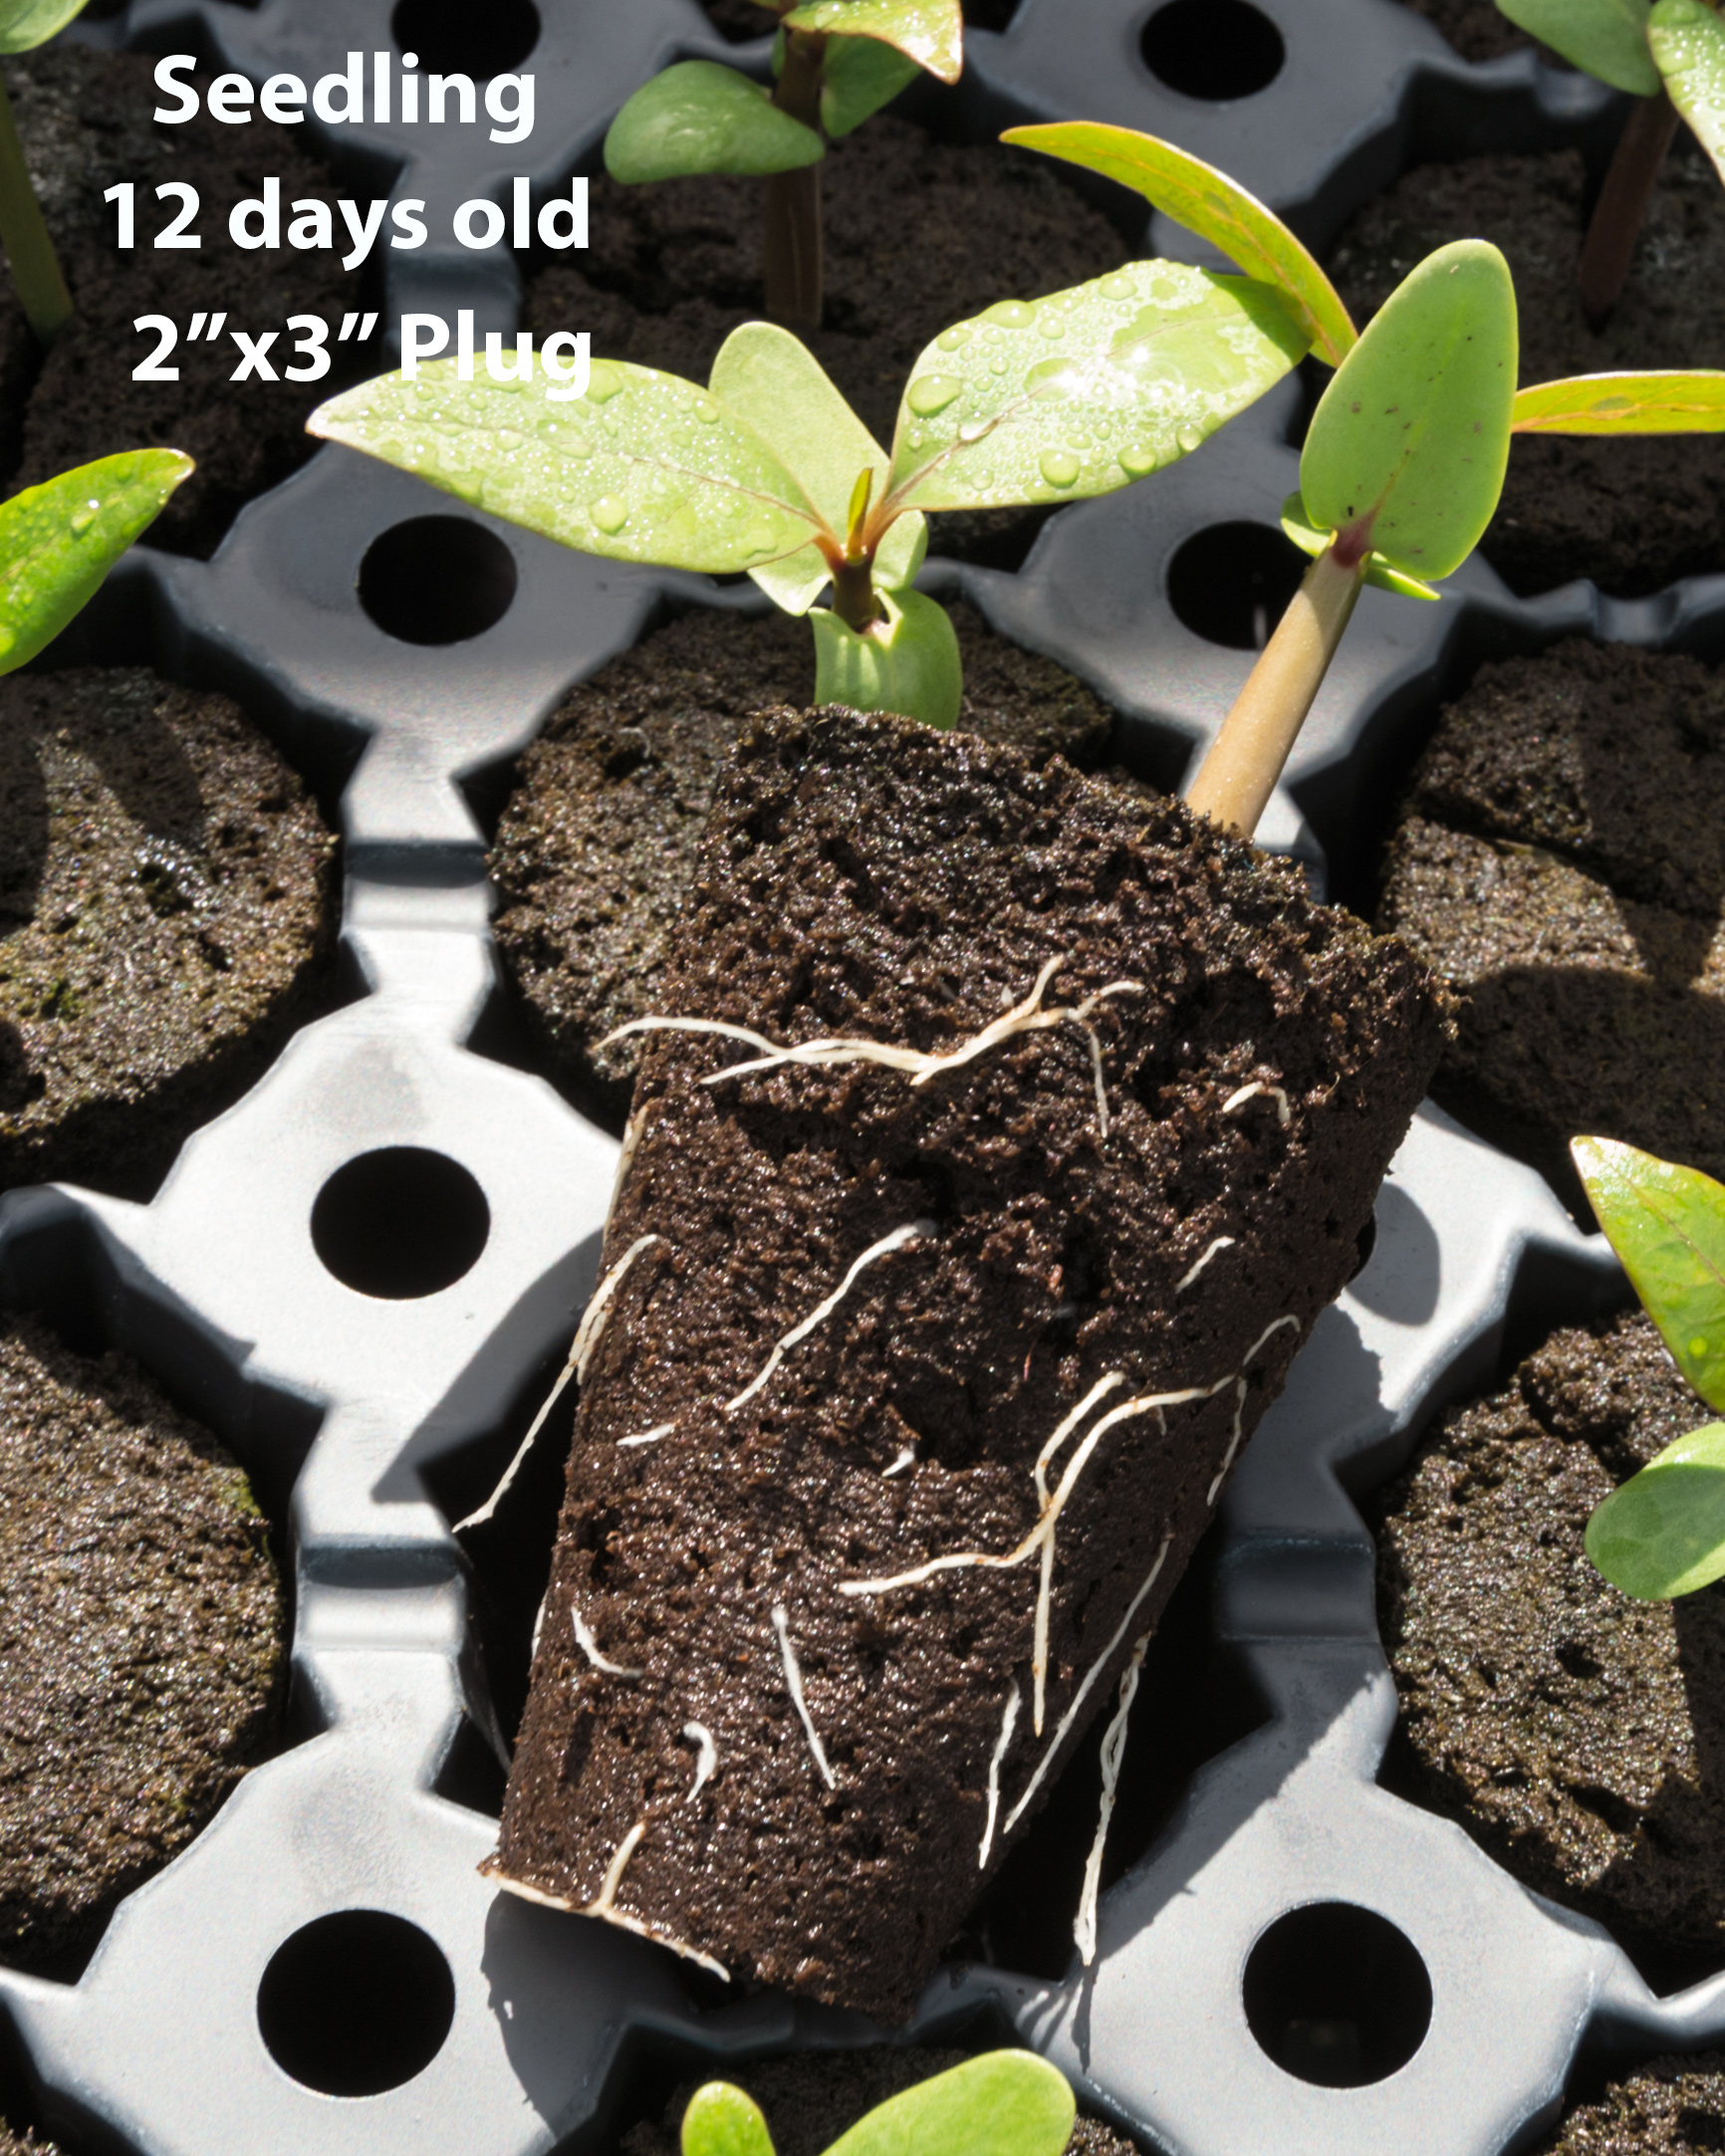
I’ve been using FlexiPlugs by Grow-Tech for the last four years to germinate seeds and grow seedlings for the first phase of root growing, with very good results results. I would like to share my experience with this Guide. Click on this linke to find out more about how I use them. My methods may need to adjusted to your growing environment. https://plumeriaseeds.com/guide-growing-plumeria-seed/
When looking for plumeria it helps to know what to look for and what to expect if you are getting a plumeria cutting, a rooted Plumeria or a grafted Plumeria.
A Plumeria Cutting is the tip of a branch cut from a donor plumeria, usually about 10″-18″ long depending on the donor plumeria growing habit. Cuttings do not have roots, but have been allowed to callus (callusing allow the cutting to form a tissue that allows roots to grow) Cutting are sold only in the Spring and Summer months. Cutting make specifically for grafting are called scion and are 6″-10″ long depending on the donor plumeria. A plumeria cutting will eventually have to be rooted for it to survive.
A Rooted Plumeria is a plumeria cutting that has been allowed to grow its own root system. For plumeria cutting to form root will take 6-8 weeks under ideal conditions or may take many months. Rooted plants should be allowed to grow roots for at least 4 months prior to winter.
A Grafted Plumeria is a plumeria cutting (scion) that has been grafted to an already mature root system (rootstock). It take about 3 week after grafting before it is ready to ship. Grafted plants are grafted to root systems approximately 18 to 24 months old, depending on the diameter of the Cutting.
Simply use Vitazyme once a month during the growing season. You can drench or water Vitazyme by hand at a rate of .9% (1 oz./gallon) over top of both the plumeria and the soil. Of course keep in mind watering times, not because Vitazyme will burn a plant (it certainly won’t), but rather follow good practices to reduce mildews and enhance water conservation.
You can also apply Vitazyme with any spray tank. We would recommend a 4% (5 oz./gallon) rate sprayed directly on the plants until run-off. Vitazyme will flow through all spray rigs, irrigation rigs including drip irrigation, and through seeders with in-furrow injection so you don’t have to worry about clogging, and have many options for applications.
A good sized garden will use less than a gallon of Vitazyme per season. Vitazyme can be stored almost indefinitely, so any leftover will be good the following season, and not wasted.
Vitazyme can tank mix with any herbicide, fungicide, pesticide or fertilizer without issue, we always recommend applying Vitazyme as part of your individual fertility/control programs. This way you will save on application costs for Vitazyme alone. Vitazyme is flexible enough so that if the recommended timing of applications varies a bit from your typical practice, you can still use it and gain valuable results.
Generally, plumeria will use 4-5 applications over the growing season. This will be defined more specifically in the guide. Remember, the guide is just that, a guide. Your growing conditions will help to dictate the exact timing of applications.
Vitazyme should be used within the context of a complete crop management system, never by itself. Vitazyme will optimize your existing program by enabling your plumeria to utilize soil fertility and water more efficiently while reducing costs and increasing productivity. This product is very effective with low nitrogen. Follow this easy-to-use five-point program.
If possible, analyze the soil at the USDA or a reputable laboratory and correct mineral deficiencies and imbalances with expert consultation.
Treating plumeria seeds or transplant roots, if possible, at planting. Treat seeds with a diluted Vitazyme solution, such as a 5% solution (4 oz./gallon). For excellent results, dip the seeds in the solution and allow to dry. For transplanting soak for approximately 30 minutes or spray transplant roots with a or 2% solution (2.5 oz./gallon).
Apply Vitazyme to the soil in Early Spring. After the initial application Vitazyme can be applied monthly. A fall application on the soil is effective to accelerate residue breakdown.
Integrate other, sustainable management practices into the total program.
Application Rates
Seeds, Cuttings and Transplants. For faster emergence and rooting, dilute at a rate of 1 oz/19 oz of water (a 5% solution) and mist all exposed areas. Allow seeds to dry prior to planting.
Potted Plumeria Application. For drenching, dilute at a rate of 1 oz/99 oz of water (a 1% solution). For foliage spraying, dilute at a rate of 4 oz/gallon (a 5% solution)
In-Ground Plumeria (for all temperate fields). Drench or spray Foliage dilute at a rate of 4 oz/gallon (a 5% solution)
Soil Conditioning (for all temperate field and in-ground plumeria). Apply 4 oz/gallon (a 5% solution) before ground freezing
Tips
Vitazyme may be tank-mixed with fertilizers, herbicide, fungicides, and pesticides.
Vitazyme does not need to be tilled into the soil after application.
The dilution rate is not critical as long as the proper application is made.
Soil moisture is needed to activate Vitazyme.
Vitazyme can be stored almost indefinitely, so no loss of investment.
Proven Efficient
Vitazyme used with your normal, sound plumeria management practices Vitazyme will increase your yields sufficiently so that you realize a substantial increase in plumeria health and productivity.
You will find that you can reduce your nitrogen input, usually between 25% and 50%, and obtain the same or higher crop yields. Nitrogen is rising in cost and is likely to remain high in the future. Saving money on your fertilizer purchases will increase your profits when using Vitazyme.
Vitazyme is a liquid concentrate microbially synthesized from plant materials and then stabilized for long life. Powerful but natural biostimulants contained in the material greatly benefit plant growth and soil conditions to boost growth and profits for the grower.
Vitazyme is non-toxic. It is organic, safe and sustainable and has an array of active agents, including:
Known Ingredients in Vitazyme (all derived from natural materials):
Brassinosteroids
0.022mg/ml
1-triacontanol
0.33 ug/ml
Vitamin B1 (thiamin)
0.35 mg/100g
Vitamin B2 (riboflavin
0.25 mg/100g
Vitamin B6
0.15 mg/100g
Vitazyme is an all-natural liquid “biostimulant” for soil organisms and plants that contain certain biological activators, which are by-products of a proprietary fermentation process. These active agents include vitamins, enzymes, and other powerful but gentle growth stimulators such as B-vitamins, triacontanol, glycosides, and porphyrins.
Vitazyme, used within the context of a common-sense management system, will help the farmer overcome many of his production problems. While not a “magic bullet,” it helps the entire system work better.
Agriculture of today must emphasize the use of biological systems — not strictly chemical approaches — to achieve long-term soil productivity.
The product promotes soil life by conforming with natural laws, by encouraging natural predators to control insect and nematode pests, by promoting more intensive biological nitrogen fixation, and by stimulating natural rhizosphere organisms to produce needed plant growth factors.
Investigations are continuing on other components:
Likely phytoactive components which will be discovered include the following:
Various porphyrins (chlorophyll derivatives)
Various glycosides (glucose derivatives)
Salicylic acid or salicylates
Amino acids such as methionine and others
Nucleic acid remnants or precursors
Nucleotides, especially adenine but possibly others
Gallic acid
Glucuronic acid
Various enzymes
Benefits to Soils
Soil structure, so critical for air and water movement through the soil to facilitate root growth and nutrient uptake, is improved by Vitazyme in at least four ways:
Increased root growth (more root channels).
More polysaccharides to glue particles together; only 0.2% more polysaccharide can markedly improve structure.
Greater earthworm activity, their burrows create channels for air and water. Water infiltration is increased, and runoff and erosion are consequently decreased. Compaction is reduced so roots can freely explore the soil for nutrients and water, increasing yields.
How Vitazyme benefits Plumeria
Vitazyme will increase chlorophyll first, allowing the plumeria to harness more energy from the sun. The plumeria will develop a larger and more efficient root system and working in conjunction with the microbial population in the rhizosphere will convert more nutrients from a non-uptake able form to forms that can be taken up by the plumeria. In this way, the soil system becomes more efficient and is the main reason why we say you can lower your nutrient inputs using Vitazyme. This, in part, explains the typical results of greater yield and quality measures for any crop.
Greater root and leaf growth
More and bigger blossoms
Improved soil conditions
Inexpensive, very cost-effective
Easy to use
Safe and non-toxic
Can be seed-applied
Can be tank-mixed with any liquid fertilizers, herbicides, and pesticides
Can run through irrigation lines without clogging
Vitazyme applied through the irrigation system–drip, sprinkler, or sprayed–will accelerate growth and maturity of plumeria, in containers or in the ground. Trunk caliper will increase faster as photosynthesis and leaf areas are accelerated. Vitazyme will improve the root, leaf, and flower growth.
Treated seeds will emerge faster, and seedling growth will be more vigorous. Improved chlorophyll development will give faster nutrition, deeper green colors, and more lustrous and attractive leaves. Vitazyme will also aid in the early development of flowers.
Expect better tilth and permeability in your soil with Vitazyme use.
Vitazyme Science
Vitazyme intensifies the activity of the plant-soil system. Photosynthesis is increased, so more carbon from the air is fixed into plant tissue. Energy-rich compounds produced in the leaves by this vigorous metabolism move into the root system and out into the soil, or media where billions of bacteria, algae, fungi, protozoa, and other organisms feed on this energy. The organisms, in turn, release minerals and growth stimulants for plant uptake…a beautiful symbiosis. Plant stress is reduced, removing growth and yield limitations.
Vitazyme Stimulates Rhizosphere Symbiosis
Vitazyme contains “metabolic triggers” that stimulate the plant to photosynthesize better, fixing more sunlight energy in the form of carbon compounds to increase the transfer of carbohydrates, proteins, and other growth substances into the root zone. These active agents may enter the plant through either the leaves or the roots. Root growth and exudation are both enhanced. This enhancement activates the metabolism of the teeming population of rhizosphere organisms to a higher level, triggering a greater synthesis of growth-benefitting compounds and a faster release of mineral for plant uptake. The plant microbial symbiosis is stimulated.
The Enzyme Cascade Effect
Very small amounts of these metabolic triggers in Vitazyme are needed to greatly improve plant and rhizosphere microbe response. This is because of the enzyme cascade effect. Successive tiers of enzymes are activated in plant and microbial tissues to yield a large physiological response from very little applied activator.
In short, Vitazyme enables the plant to better express its genetic potential by reducing the stresses that repress that expression.
Improved Symbiosis: The Secret of Vitazyme’s Action
All plants that grow in soils develop an intimate relationship between the roots and the organisms that populate the root zone. The teeming billions of bacteria, fungi, algae, cyanobacteria, protozoa, and other organisms that grow along the root surfaces—the rhizosphere—are much more plentiful than in the bulk of the soil. This is because roots feed the organisms with dead root epidermal cells as well as compounds exuded from the roots themselves. The plant may inject up to 25% or more of its energy, fixed in the leaves as carbohydrates, amino acids, and other compounds, into the root zone to feed these organisms… for a very good purpose.
The microorganisms which feed on these exuded carbon compounds along the root surfaces benefit the plant in many ways… a beautiful symbiotic relationship.
The plant feeds the bacteria, fungi, algae, and other microbial species in the rhizosphere, which in turn secrete enzymes, organic acids, antibiotics, growth regulators, hormones, and other substrates which are absorbed by the roots and transported to the leaves. The acids help dissolve essential minerals, and reduced iron releases anionic elements.
A few important microbe groups are listed below.
Mycorrhizae, especially vascular-arbuscular (VAM) tyes, form “arbuscules” within root cortical cells and extend thread-like hyphae into the soil, increasing the root feed surface by ten times or more. They are the major means for uptake of phosphorus, copper, zinc, and other less mobile elements. They also can extract water under much drier conditions than can root plants.
Cyanobacteria fix carbon (they photosynthesize), and also fix nitrogen from the air for plant use.
Phosphate-dissolving bacteria excrete acids that dissolve minerals and release hard-to-get phosphorus.
Azotobacter species live on exudates and other carbon sources while fixing nitrogen.
Actinomycetes generate a variety of pathogen-fighting antibiotics.
Carl Pool Root Activator is a 100% natural product which safely promotes regeneration of roots through increased elongation rates. Root Activator stimulates fast root growth, reduces transplant shock, and hastens plant establishment. Use on all newly planted or transplanted plants and soil, and any time additional root growth is desired to reach the potential of underperforming plants.
Carl Pool’s Root Activator contains 7.5% glycosides. It prevents transplant shock and stimulates fast root growth.
Description: Natural glycosides derived from pecan shells and water. Glycosides are compounds which comprise a wide array of substances that make up a significant proportion of cellular and tissue contents of plants and as a critical influence on plants in root, stem and leaf development. Beneficial flavonoids often occur as glycosides; some important as coloring agents for flowers to attract insects and birds while others promote disease resistance. Carl Pool Root Activator prevents transplanting shock and stimulates fast root growth and forking of the root system.
Application Recommendations:
Mix 1 pint to 5 gallons of water or 8 Tbsp. to 1 gallon of water. Saturate entire root area of a plant. Repeat every 30 days until desired results are achieved.
Plumeria plant in containers: Use from 1 to 5 gallons of the diluted solution around each plant depending on the size of the pot and root area.
Plumeria Trees in Ground: Saturate entire area within the drip line. Use from 3 – 10 gallons of the diluted solution around each tree depending on the size of trunk diameter.
Although people have been rooting plumeria in water with some success, this is not the best way to root your plumeria. The roots that form in water are not the same as roots that form in the soil. They are fragile and brittle, adapted to growing in water as opposed to soil. Once you transfer a water-rooted plant to the soil, many of these roots will break off immediately and the rest will shrivel and die up as they’re replaced by the more robust roots adapted to the soil.
If you do water root, Just remember once a plant is in water, it will develop “water roots” and feed itself with water nutrients. When you put it in soil, after all that is where they grow naturally, the first week, keep it in a cup, so the soil is really wet, puddle like, then gradually as the weeks go by, decrease the water and just let the soil be moist.
That way, it eventually will resend out new dirt roots, and can feed itself accordingly.
Is rooting in the soil the best way for Plumeria?
Rooting in soil is the best way to get strong roots,
To get the best results, follow these simple steps:
Use healthy cuttings, preferably from newer growth. Take the cutting with a sharp knife or cutters. Although it depends on the cultivar, most cuttings should range from ten to fifteen inches.
Trim the cutting of all leaves. Leaves will cause the cutting to lose valuable moisture. If you’re using a rooting hormone apply immediately after taking the cutting.
Plant the cutting in your potting medium. Lightly tamp the mix around the stem of the cutting to provide support.
Water the soil well and place in a warm dry area. Most plumeria cuttings do well in full sun while they root. Cuttings thrive on warmth and humidity, but the potting soil should be well draining and kept dry after the first watering. A good rooting mix is 1 part potting soil mix with 1 part perlite. Misting the cutting is ok if you see signs of wrinkling.
When you see 3-4 new leaves and the new plant is established with healthy root growth. Transfer it to a new pot with fresh well-draining potting soil.
And that’s it! You can root most cultivars from cuttings, but if you find that you’re having a hard time with any particular cultivar, make sure you’re not overwatering. For difficult to root plumeria cuttings, try a plant grow mat placed under the pots to encourage new root growth or try grafting.
Plumeria roots grow best when the root zone temperature is between 75 and 85 degrees.
I would like to share our vision of the best possible regiment, SO FAR, for our plumeria growing in South Florida. I hope the following helps you with your goals and plans for 2017.
The goal is to know what, when and why, so you can improve every year by giving your plumeria the best growing environment. Making a plan and documenting all adjustments will allow you to look back and hopefully determine where you can make improves.
Before the season starts we always examine what we did last year and try and determine how we can improve our methods and products. The following is an outline of what we’re planning for our 2017 Care Regiment at Florida Colors. Please keep in mind your growing environment and how it differs from South Florida Zone 10B. The start of your plan should correspond to when you are past the threat of a frost or freeze. You should also make a plan to protect you plumeria from cold weather, just in case you get caught.
While the Moragne hybrids are limited in availability outside of Hawaii, seeds, and cuttings of many other plumerias can be obtained through various mail-order catalogs and botanical gardens. Visitors to Hawaii often carry home cuttings of plumeria to remind them of their tropical vacations. The University of Hawaii receives many inquires about caring for these plants when they are taken to more northern climates.
It is important to remember that wild plumeria was found in hot, dry areas, often in poor soil, and on rocky limestone cliffs. While they respond readily to water and fertilizer, an overabundance of either tends to cause leggy growth with few flower clusters. Another problem with overwatering is the loss of roots due to the lack of air in the growing medium. For container culture, a well-drained medium is very important, and water should be applied only when the soil seems dry.
Plumeria growers in Hawaii often feed them year-round with a 10-30-10 fertilizer, believing that the extra phosphorous helps promote flower productivity. Recent research by horticulturists at the university has suggested that there is some validity to this practice, as trees fed with higher analysis phosphorus fertilizer had more growing points and slightly more flower clusters than trees given 10-10-10 or 10-20-10 fertilizer. Their rates of feeding were from one to four pounds of fertilizer per tree per year, based on tree size, and four applications (roughly a quarter pound of fertilizer per inch of trunk diameter up to four inches, spread under the drip line). In northern areas with short growing seasons, the most important feedings will be the early and late ones. The spring feeding will help to develop the flower clusters and vegetative growth, while the late summer feeding, which should be low in nitrogen, will aid in setting the flower buds for the next year. Both organic and inorganic fertilizers are satisfactory.
In their native habitat, plumerias probably shed their leaves during a long dry spell, releafing when there is sufficient water. Regular and frequent deep irrigations promote long shoots. Thus, container culture is a balancing act between the grower’s goal of a perfect leafy, floriferous plant and the plumeria’s tendency to keep growing or to shed leaves and go dormant.
For good flowering, light and temperature are probably most important than water. The trees flourish in full sunlight and set few buds when shaded by taller trees or buildings. Very little growth or flowering occurs once the temperatures drop into the sixties and lower. Leaf retention, on the other hand, is more a matter of day length than temperature; growth decreases, too, as the days become shorter.
Plumeria fanciers in cold climates simply allow their plants to defoliate and go dormant in the fall. Then they bring them indoors, either bare-rooted or still in pots, and store them in a protected place-a garage, basement, or attic-where they won’t freeze. In March or April, they repot them if needed and once the danger of frost is past, they set the plants out to enjoy an early bloom. Growth and flowering are rapid with the return of temperatures to the seventies and eighties in spring and summer. They will grow and flower happily throughout the warm summer and fall months.
Those who want to attempt William Moragne’s method of cross-fertilizing plumeria will know within a month if they have a “take”; swellings should appear in two lobes at the base of the flower. The seed pods require six to nine months to mature, and eleven months to split open naturally.
Good seed is plump when squeezed lightly. Each has a little papery wing that enables seed dispersal by wind. If dried slightly and stored in good condition, they may remain viable for up to a year, but it is best to sow them immediately for a high germination percentage. Seeds should be sown shallowly or stuck into the medium with the wind protruding. They should germinate in two to three weeks. Seedlings can be transplanted as soon as their stems have thickened and true leaves appear. Plumeria fanciers have observed flowering within a year, but more often it takes two to five years. For the last of his hybrid seedlings to bloom, William Moragne waited eighteen years.